
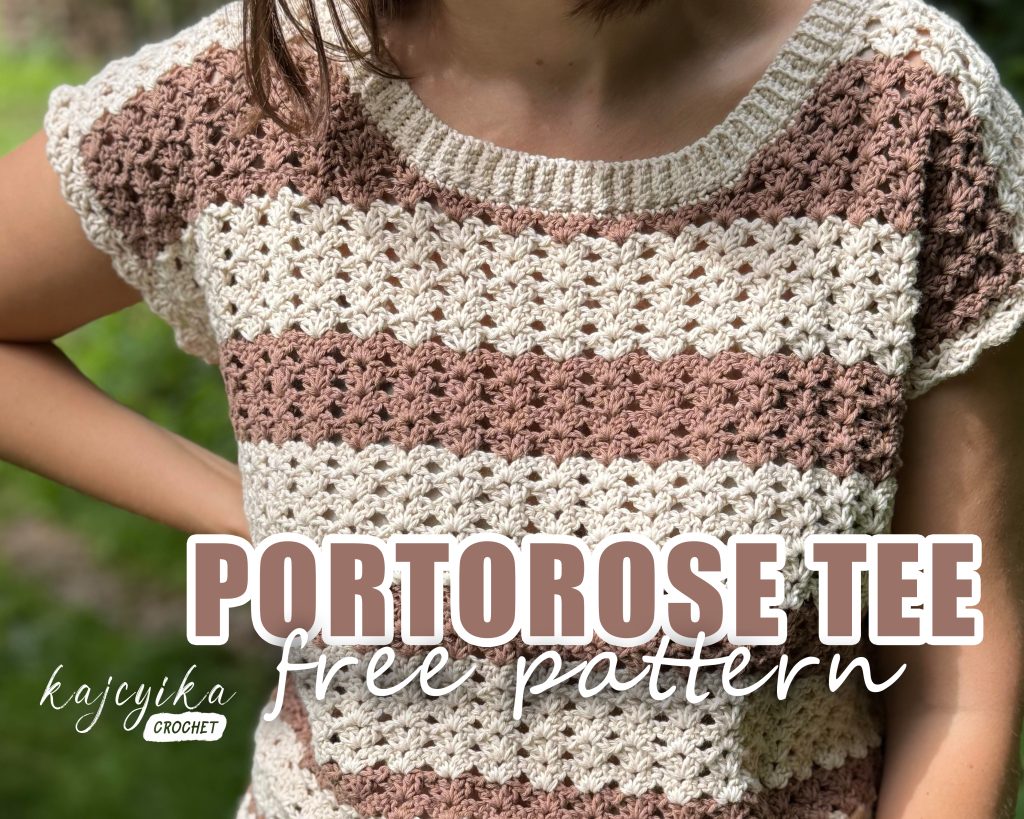
I’m truly excited to share this crochet tee pattern with you, and I want to start by saying thank you so much for stopping by. Whether you’re here to take a look or you’re thinking about making this tee, I’m really glad you’re here.
Creating this design has been a labor of love, and it means the world to me that you’re considering making it part of your handmade wardrobe. I hope you find this pattern both enjoyable and rewarding to work through.
I appreciate your interest in this design and your support means a lot. I hope you enjoy the process and feel great wearing your handmade tee.
Now, let’s get stitching!
Disclaimer
Please do not copy, redistribute, or resell this pattern in any way, including creating a video tutorial. You may sell your finished piece but please credit me as the pattern designer.
If you share your piece on social media, please credit me as the pattern designer. I would love if you tag me!! I really enjoy seeing your beautiful work.
Gauge
This pattern is made to measure, so you don’t need to obtain any gauge.
Materials
- Two shades of the same type of yarn. I used Hobbii – Friends cotton 8/6 in colors in Oatmilk (03) and Cappuccino (10).
- Crochet hooks. I used 4mm hook for the main part and 3mm for the collar.
- Stitch markers
- Sewing needle
- Scissors
- Tape measure
Abbreviations
US terminology
CH – chain
Sk – skip
St – stitch
Rep – repeat
CH SP – Chain space
SS – slip stitch
SC – single crochet
HDC – half double crochet
DC – double crochet
BLO – back loop only
RS – right side
WS – wrong side
Pattern Notes
- Chain 3 counts as starting st of the next row. (see chart for better understanding)
- You can replace chain 3 turning chain with stacked single crochet.
- You can replace starting chain and first row of DC with the foundation DC row. In this case, you should have a multiple of 4 +1 DCs as a foundation (without additional 3 ch).
- The first color you use will be referred as color A and the second one will be referred as color B.
Measurements
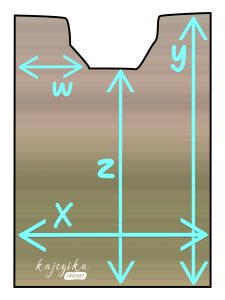
The pattern is made to measure. Before you start, measure these 4 things and mark them down:
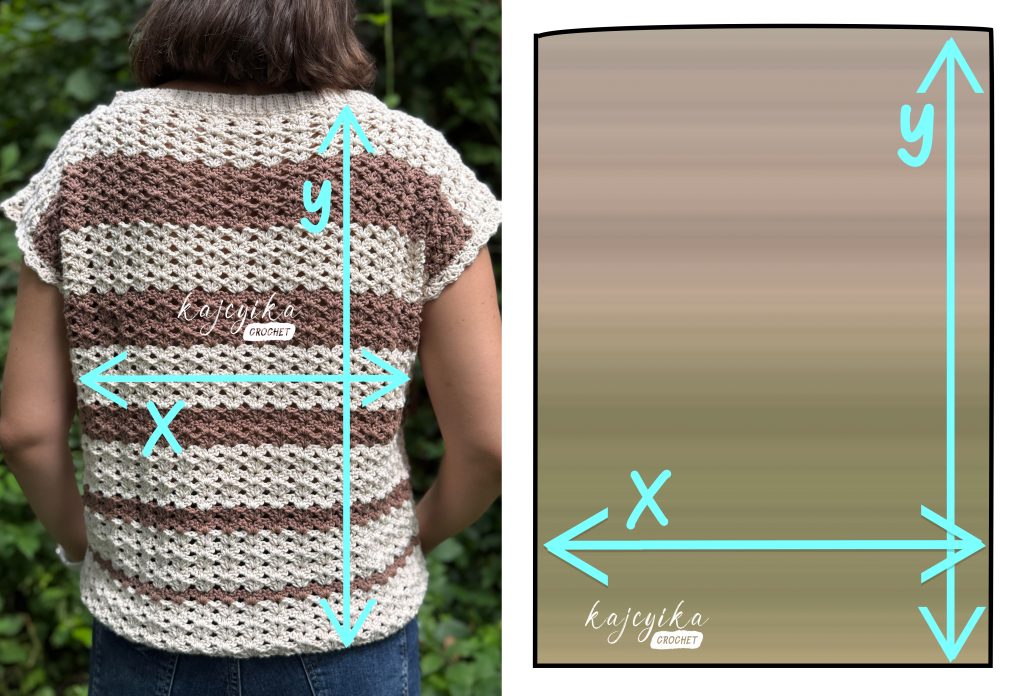
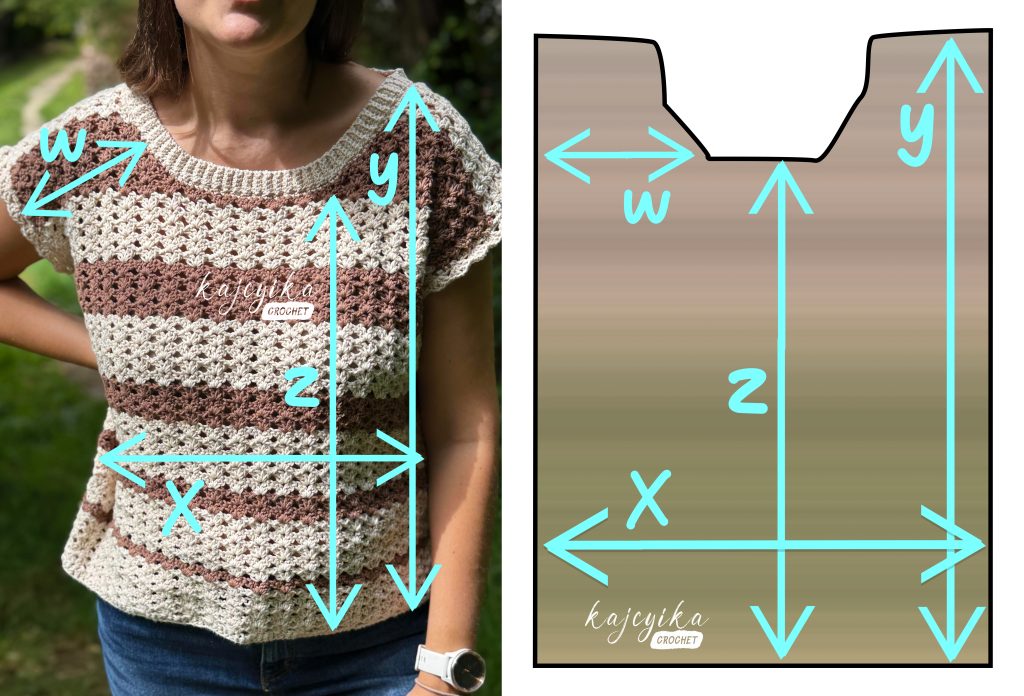
Width (measured as bust size divided by 2) – Measurement X
Length – Measurement Y
Height of the neckline – Measurement Z
Width of the shoulder strap – Measurement W
My version was designed to have a small positive ease, which means it’s meant to be slightly oversized. If you want to make it tighter, you can always change the calculations to have negative or no ease at all.
In case you would like to have some positive ease as I have, add additional 2 inches (5cm) to your measurement X. Mark that down as your new measurement X.
Note that in case you decide to have your top fitted with negative or no ease, your tee may look like a tank top. To make it look like a tee again, you can do more than one row of clusters for the sleeves.
Back panel:
Front panel:
PATTERN
Color pattern follows a simple stripe logic which is:
- 5 rows of clusters in color A
- Increasing number of rows of clusters in color B. Starting with 1 row and increasing by 1. This means, first stripe in color B is 1 row, second stripe in color B is 2 rows, third stripe in color B is 3 rows,…
Back panel
Row 1 (color A): Chain a multiple of 4 in the desired width (measurement X). Chain additional 3 and turn.
Row 2 (color A): DC into the 4th ch from the hook and to every chain until the end.
At this point your row should be: A starting chain of 3 and the rest are DCs. The number of DCs should be a multiple of 4.
Row 3 (Color A): Chain 3 and turn. Into the 3rd DC from previous row do (2DC, CH, 2DC), *sk 3 st, (2DC, CH, 2DC) into next st*. Rep ** until 2 st remain. Sk st, DC in the top CH of chain 3 from previous row.
Row 4-7 (Color A): Chain 3 and turn. *2DC, CH, 2DC* into the CH SP. Rep ** until the last CH SP. DC in the top CH of chain 3 from previous row. (4 rows)
Row 8 (Color B): Change color. Chain 3 and turn. *2DC, CH, 2DC* into the CH SP. Rep ** until the last CH SP. DC in the top CH of chain 3 from previous row. (1 row)
Following rows will all be crochet in the same manner. The only thing you have to be careful is that you always have 5 rows of Color A and you are increasing the number of rows in color B (first stripe in color B is 1 row, second stripe in color B is 2 rows, third stripe in color B is 3 rows,…).
Row 9-13 (Color A): 5 rows
Row 14-15 (Color B): 2 rows
Row 16-20 (Color A): 5 rows
Row 20-23 (Color B): 3 rows
Row 24-29 (Color A): 5 rows
…
Continue crocheting and changing colors until you reach measurement Y. Cut the yarn and pull through.
Chart:
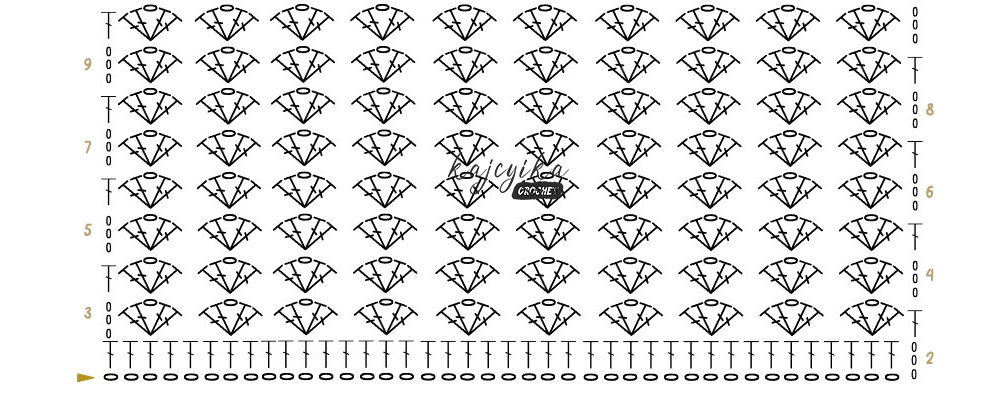
Front panel
Row 1 (color A): Chain a multiple of 4 in the desired width (measurement X). Chain additional 3 and turn.
Row2 (color A): DC into the 4th ch from the hook and to every chain until the end.
At this point your row should be: A starting chain of 3 and the rest are DCs. The number of DCs should be a multiple of 4.
Row3 (Color A): Chain 3 and turn. Into the 3rd DC from previous row do (2DC, CH, 2DC), *sk 3 st, (2DC, CH, 2DC) into next st*. Rep ** until 2 st remain. Sk st, DC in the top CH of chain 3 from previous row.
Row4-7 (Color A): Chain 3 and turn. *2DC, CH, 2DC* into the CH SP. Rep ** until the last CH SP. DC in the top CH of chain 3 from previous row. (4 rows)
Row 8 (Color B): Change color. Chain 3 and turn. *2DC, CH, 2DC* into the CH SP. Rep ** until the last CH SP. DC in the top CH of chain 3 from previous row. (1 row)
Following rows will all be crochet in the same manner. The only thing you have to be careful is that you always have 5 rows of Color A and you are increasing the number of rows in color B (first stripe in color B is 1row, second stripe in color B is 2 rows, third stripe in color B is 3 rows,…).
Row 9-13 (Color A): 5 rows
Row 14-15 (Color B): 2 rows
Row 16-20 (Color A): 5 rows
Row 20-23 (Color B): 3 rows
Row 24-29 (Color A): 5 rows
…
Continue crocheting and changing colors until you reach measurement Z. Do not cut the yarn!
Decreases
When crocheting the decreases, the stripes should continue following the same logic of color change. The colors should match with the back panel.
Count the total number of rows on the back panel and determine how many rows you have left to crochet to get to the same number of rows on the front panel. Divide the number of remaining rows by 2 and write down the whole part of the number you get with division.
The calculated number:_______
The first half of the remaining rows will be decreasing rows and the rest won’t have decreases.
Next, mark the width of your collar by marking the left and right CH SPs that are closest to your W measurement, measuring from the sides towards the center. You should have the same number of clusters on the both sides.
Now start crocheting while still following the color pattern.
Right side:
You should have ended your last row on DC in the top CH of chain 3. Next:
Row 1: Chain 3 and turn. *2DC, CH, 2DC* into the CH SP. Rep ** until the right St marker. 2DC into the CH SP with the St marker.
Row 2: Chain 3 and turn. *2DC, CH, 2DC* into the CH SP. Rep ** until the end. DC in the top CH of chain 3 from previous row.
Row 3: Chain 3 and turn. *2DC, CH, 2DC* into the CH SP. Rep ** until the second to last CH SP. 2DC into the last CH SP.
Repeat rows 2 & 3 until you reach the number of rows you calculated by division in previous step.
Next, crochet the rows without decreasing as follows:
Row: Chain 3 and turn. *2DC, CH, 2DC* into the CH SP. Rep ** until the last CH SP. DC in the top CH of chain 3 from previous row.
Continue crocheting until you reach the measurement Y. Cut the yarn and pull through.
Right side chart:
The decrease rows start at the arrow.
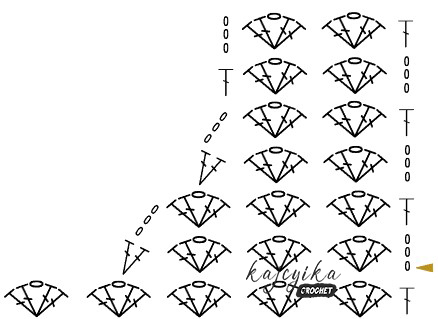
Left side:
Reattach your yarn to the left St.marker.
Row 1: Chain 3. DC into the same CH SP. *2DC, CH, 2DC* into the CH SP. Rep ** until the end. DC in the top CH of chain 3 from previous row.
Row 2: Chain 3 and turn. *2DC, CH, 2DC* into the CH SP. Rep ** until the second to last CH SP. DC in the top CH of chain 3 from previous row.
Row 3: Turn. SS in the 2DC from last row. Chain 3. DC into the same CH SP. *2DC, CH, 2DC* into the CH SP. Rep ** until the end. DC in the top CH of chain 3 from previous row.
Repeat rows 2 & 3 until you reach the number of rows you calculated by division in previous step. Make sure that the number of decrease rows is the same on right and left side.
Next, crochet the rows without decreasing as follows:
Row: Chain 3 and turn. *2DC, CH, 2DC* into the CH SP. Rep ** until the last CH SP. DC in the top CH of chain 3 from previous row.
Continue crocheting until you reach the measurement Y. Cut the yarn and pull through.
Left side chart:
The decrease rows start at the arrow.
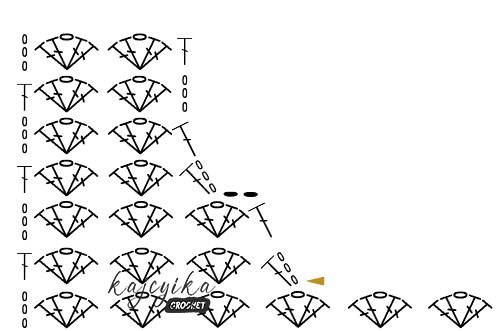
Final touches
After crocheting all the parts, join them together using your preferred joining method. The panels should be joined in the following manner, taking under the account that you should leave the arm hole in size of your arm.
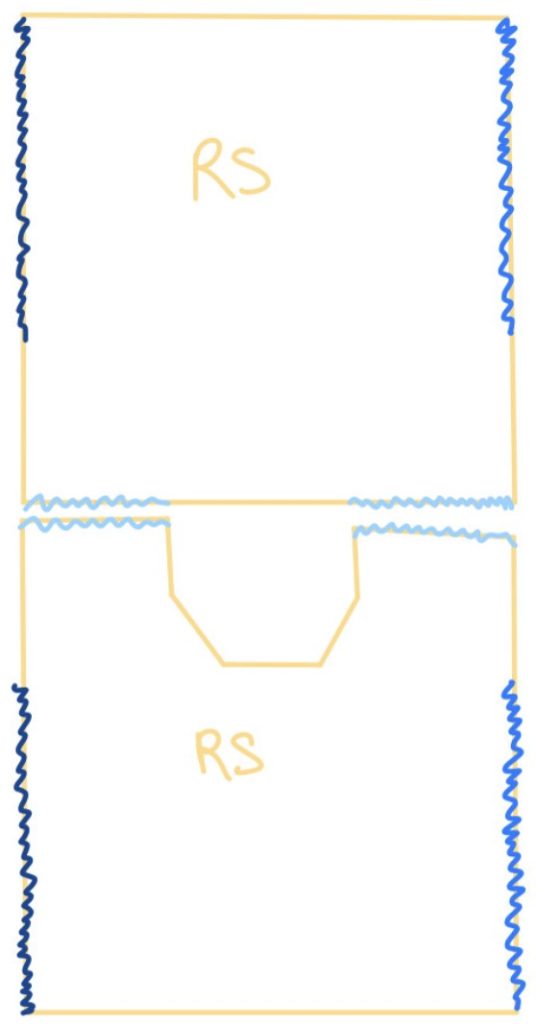
Collar
Reattach your yarn in color A to your neckline at one of the shoulder joins. Use a hook one size smaller then the one you used for the body. I used 4mm for the body and 3mm for the collar.
Base row: SC around the collar spacing the stitches equally. My suggestion is to do one SC into the top of DCs and CH SPs, while doing two or three SC into the CH3 and sides of the DCs. Join the round with SS into the first SC.
Next:
Row 1: Chain 5 (or any other number of chains that is greater than 5 and gives you the desired width of the collar)
Row 2: Chain 2 and turn. BLO HDC into the 3rd CH and all remaining CHs.
Row 3: SS into the next 3 St of the base row. and turn. BLO HDC into the top of the first HDC (4th St) and all remaining HDCs.
Row 4: Chain 2 and turn. BLO HDC into the 3rd st (last HDC from previous row) and all remaining HDCs.
Repeat row 3 and 4 until you reach the last base stitch. Join the round by SS through both, the starting chain and BLO of your last row of HDCs. Cut the yarn and pull through.
Sleeves
Reattach your yarn in color A at one of the under-shoulder joins. Use the same hook as for the body. I used 4mm.
Base row: SC around the collar spacing the stitches equally. My suggestion is to do one SC into the top of DCs and CH SPs, while doing two or three SC into the CH3 and sides of the DCs. Join the round with SS into the first SC.
Row 1: Chain 3, DC into the same St. *sk 3 st, (2DC, CH, 2DC) into next st*. Rep ** until you have less than 4 st of the base row left. Sk the remaining sts, 2DC into the first st, Chain 2. Join by SS to the first chain 3 .
Do the same for the other sleeve.
Weave in the ends and enjoy your top!